EN DE
Cronosurf
Cronosurf is a technology demonstrator for the design and usability of watches and chronographs. Its most promising prototypes are available as HTML5 applications for web browsers and as native apps for Android and Wear OS.
The name Cronosurf stands for time (chronos) and the freedom of surfing on and through it with ease and elegance. Hence the slogan surf the time. The 'h' was deliberately omitted to achieve a certain uniqueness in the watch segment.
Wave
There are multiple Cronosurf designs or models today. The main one, which you can see above, is called Wave. It resembles a fully featured analog chronograph watch which, one day, could be built as a high-end electronic wrist timepiece.
Besides the conventional time functions, Cronosurf Wave offers the following features:
- 12-Hour Stopwatch/Chronometer with 1/20 of a second resolution
- Split function for the stopwatch
- Flyback function for the stopwatch
- QuickStopwatch function
- 12-Hour Countdown-Timer with optional automatic repetition
- 24-Hour Dial
- World Time based on UTC (with 15-minute steps)
- Daily Alarm
- Current date, day of the week and the unique Cronosurf monthly calendar
- Innovative 100-year-Calendar
- Week number
- Temperature indicator
- Adjustable motion mode of the seconds hand: pulse or sweep
- Adjustable operation direction for the set buttons: logic or geometric
- Help function: Button Assistant
- Lots of extra functions that you've probably never seen on other chronographs
Cronosurf Wave was designed to be fun and functional at the same time. More and more people agree: this watch is a masterpiece for horology enthusiasts. Enjoy!
Tip: To quickly start a 4-minute-countdown, go to the address bar of your browser and enter:
See also
If you like Cronosurf...
... and are interested in its further development or want to send us any kind of feedback, please feel free to
If you wish to support our work...
... and be part of the Cronosurf vision, visit our
Our Android and Wear OS apps
User Manual for the Android app
The Android app comes with its own user manual. For your convenience, it is now also separately available (in HTML and PDF formats) on our
User Manual - Cronosurf Wave Web
General
Upon first loading Cronosurf Wave, the watch appears on the middle of your web browser. The watch will try to use the window space optimally. Adjust your browser window as needed.
If you wish, you can isolate the watch with the full-display mode pressing the F-key (press it aggain to switch back to normal). Additionally, you can switch to the full-screen mode of your browser (usually via the F11-key).
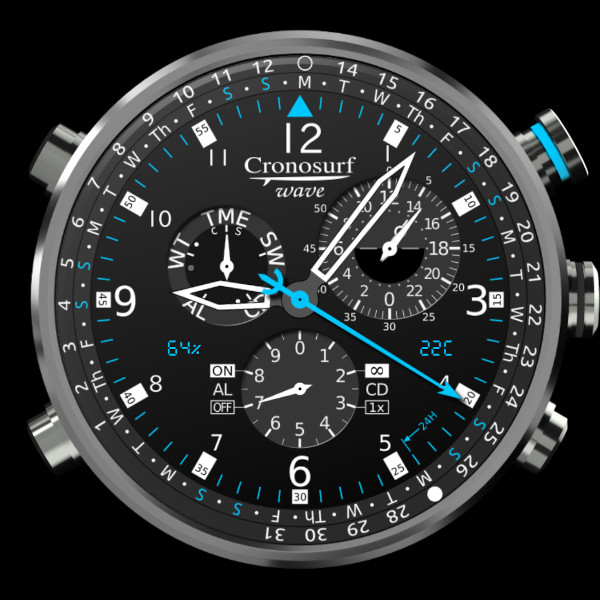
The following figure shows the main parts of the watch and the operation buttons:

Figure 1. Parts of the watch
Press button [A] to change the watch mode clockwise and [B] to change it counter-clockwise. The function of the buttons [C], [D] and [SET] are mode dependent according to the following table:
| Function of buttons | |||||
|---|---|---|---|---|---|
| Mode | Condition | Submode | [C] | [SET] | [D] |
| TME | QuickStopwatch | Enter the Calendar | - | ||
| Calendar | set Month (+1 or CCW)* |
Exit the Calendar | set Month (-1 or CCW)* |
||
| SW | SW not running | Start | - | Reset | |
| SW running | Stop | Split | Flyback | ||
| CD | CD not running | Start | Enter set submode | Reset | |
| CD running | Stop | - | Toggle CD Once/Infinite | ||
| Set | set Hand (+1 or CCW)* |
Next hand / exit set submode | set Hand (-1 or CCW)* |
||
| AL | Toggle On/OFF | Enter set submode | - | ||
| Set | set Hand (+1 or CCW)* |
Next hand / exit set submode | set Hand (-1 or CCW)* |
||
| WT | - | Enter set submode | - | ||
| Set | set Hour offset (+1 or CCW)* |
Exit set submode | set Hour offset (-1 or CCW)* |
||
Long-pressing of buttons
In some situations, specific buttons have a special function when they are pressed and held down for at least 1 second. This will be referred to in this manual sometimes simply as a long-press.
Situational awareness
When reading the watch, we recommend always taking the first glance at the mode indicator in order to be aware of the current mode (and possibly submode) and therefore of what the main hands are indicating. We also recommend often controlling the alarm ON/OFF state, which is shown by the decimals hand in all modes except SW and CD.
Audible Signals
There are five different audible signals:- Single beep, normal pitch:
- confirms the START function in both SW and CD modes
- confirms turning the alarm ON/OFF
- confirms the activation of the CD operating mode "1x"
- indicates entering a setting procedure or the calendar mode
- Single beep, high pitch:
- confirms the STOP and RESET functions in both SW and CD modes
- indicates finishing a setting procedure or exiting the calendar mode
- confirms the return to the time mode upon long-pressing button [A]
- confirms the split release in SW mode
- Two beeps in rapid succession:
- confirm that the CD operating mode is Infinite (either upon mode activation or at every start of the countdown)
- confirm the split time measurement while in SW mode
- Two beeps, normal pitch, repeating every 1.5 seconds:
- countdown alarm (will continue for 30 seconds unless stopped by pressing any button*)
- Four beeps, normal pitch, repeating every 2 seconds:
- regular alarm (will continue for 30 seconds unless stopped by pressing any button)
Settable Modes
The following main modes have settings that can be changed by the user:- CD (Countdown Timer)
- AL (Alarm)
- WT (World Time)
This is accomplished through set-submodes which are activated by pressing the [SET] button. A single beep will be heard and the hand to be set will shortly perform a wiggling motion. Now, press buttons [C] or [D] as needed to change the value of the active hand. Holding the button pressed will continuously change the value. Once the desired value has been reached, press button [SET] again to proceed with the next hand. After the last hand is set, pressing button [SET] once more will exit the set submode. This will be confirmed by a high pitched beep.
Depending on the preference setting for the set buttons, its operation direction may be either logic ( [C] + / [D] - ) or geometric ( [C] CCW / [D] CW ).
Note: Each of the settable modes has a dot symbol on the mode dial (see Figure 1.). The mode hand will advance to this position to indicate that the set submode is active.
Note: If during the setting procedure one of the buttons [A] or [B] is pressed, the settings up to this point will be accepted, a confirmation high pitched beep will be heard and the mode will change as commanded.
The 24-Hour Subdial
One distinctive characteristic of Cronosurf Wave is its 24-hour subdial which shows the 24-hour position at the bottom, unlike most other chronographs where it appears at the top. We believe that this approach, with noon at the top and midnight at the bottom, is more intuitive and informative, since the hour hand corresponds approximately to the sun position as seen when facing south. For this reason, the 24-hour hand has a small circle on it symbolizing the sun.
This subdial shows the world time when in TME mode. In all other modes however (even in calendar submode), it shows the local time. This means that, regardless of the active mode, you will always see the local time either on the main dial or on the 24-hour subdial.
Title Bar
As a convenience, the title bar of the browser (and the title of the tab in which Cronosurf Wave runs) will show some useful information. Whenever there is either an alarm or a countdown timer active, the title bar will show the remaining time to the next audible signal, e.g. "AL in 7h32m" or "CD: 46s". During the audible signal, the title bar will show which type of alarm is audible, either "ALARM!" or "COUNTDOWN!". This helps to find the tab with the alarm in a browser with many open tabs.
Preferences
Click on the gear symbol ![]() below the watch to access the preferences. Here you can change:
below the watch to access the preferences. Here you can change:
- the color of the highlights *
- the background of the watch face *
- the motion mode of the seconds hand (pulse/sweep)
- the QuickStopwatch function (off/on)
- the operation direction of the set buttons (logic/geometric)
- the temperature indicator options
- the language
Changing the preferences marked with the asterisk (*) will automatically reload the page in order to apply the new setting.
These preferences will be restored every time the watch is loaded.
If you want to reset these preferences together with the internal watch settings to default values, click on "Reset All".
Internal Watch Settings
As a convenience, the internal watch settings are also restored upon loading of the page. These are:- Alarm time and its state (ON/OFF)
- Countdown time and its mode (Once/Infinite)
- World Time offset hours
Help Function and Button Assistant
Click on the interrogation symbolUsing Cronosurf Wave
Watch Modes
Time mode (TME)
This is the basic watch mode for local time keeping with conventional hands for hours, minutes and seconds on the 12 hour dial (main dial). When in this mode, the 24-hour dial indicates the world time, whereas the second-decimals hand shows the state of the alarm (ON or OFF).
With the help of the date indicator, you can easily determine whether the indicated time corresponds to AM or PM. (See below "Date and Day").
Shortcut
To return to the time mode from any other mode, press button [A] for 1 second.
Stopwatch Mode (SW)
The stopwatch or chronometer mode offers a time measuring function from 0 to 12 hours. While the hours, minutes and full seconds are shown by the big hands on the 12 hour dial, the subdial on the bottom shows the decimals of a second. On this dial, half decimals can be indicated which leads to a resolution of 1/20 of a second.
Press button [C] to start and stop the stopwatch. While stopped, press button [D] in order to reset the hands to the zero position. The operation START is confirmed by a single normal pitched beep, while the the operations STOP and RESET are confirmed by a single high pitched beep.
During the first five minutes, the seconds hand will be driven smoothly and the second-decimals hand will run continuously. After this period of time, the stopwatch will change into the power saving mode (see below under "Technology"). In this mode, the seconds hand will move in the regular sweep mode or one-second-step fashion (depending on the setting), and the second-decimals hand will be parked at the zero position. Once the stopwatch is stopped, the second-decimals hand will move to the value that corresponds to the time measurement.
If you change to another mode while the stopwatch is running, the time measurement will continue to work internally.
QuickStopwatch
When QuickStopwatch is enabled, pressing button [C] while in time mode (TME) will immediately change the mode to SW, reset the stopwatch if needed and start it. In case the stopwatch was already running, only the mode will change to SW and the current measurement will continue.
Flyback function
Press button [D] in SW mode when the stopwatch is running to stop, reset and restart the stopwatch with a single push of a button.
The flyback function is also known by these names:
- Retour-en-vol (French)
- Taylor system
- Permanent zero setting
Split function
While the stopwatch is running, you may measure a split time by pressing [SET]. This will be confirmed by two beeps in rapid succession at normal pitch and by the mode hand pointing at the 'S' of SW (stands for Split). The stopwatch hands pause to show the split time, but the stopwatch continues to run in the background.
Press [SET] again to release the split time. This is confirmed by a high pitched beep.
To measure cumulative split times:
| [C] | → | [SET] | → | [SET] | → | ... | → | [C] | → | [D] |
| START | SPLIT | SPLIT RELEASE | Repeat as needed | STOP | RESET |
To measure two times, like the finishes of two runners:
| [C] | → | [SET] | → | [C] | → | [SET] | → | [D] |
| START | SPLIT 1st runner finishes Display 1st time |
STOP 2nd runner finishes |
SPLIT RELEASE Display 2nd time |
RESET |
Countdown Timer Mode (CD)
The countdown timer gives an audible signal after a predefined time that can be set between 1 second and 12 hours.
Press button [C] to start and stop the timer. While stopped, press button [D] to reset the hands to the preset countdown time. The operation START is confirmed by a single normal pitched beep, while the the operations STOP and RESET are confirmed by a single high pitched beep.
To set the countdown timer, press button [SET] while the timer is stopped. The hour hand will shortly wiggle. Change its value with buttons [C] and [D] as needed. Repeat the procedure for the minutes and seconds hand. Pressing [SET] once again finishes the setting procedure which is confirmed by a high pitched beep.
The countdown timer has two different modes, 1x (once) and ∞ (repeat infinitely):
Mode 1x: Once the countdown has been completed, the audible CD alarm will be heard (2 beeps every 1.5 seconds) during 30 seconds, unless it is confirmed by pressing any button. After this, the CD will be automatically reset and be ready for its next use.
Mode ∞: The timer will reset itself automatically and run from the beginning in an endless loop. Each time a countdown cycle is completed, there will be only one CD audible signal cycle (2 beeps).
The current mode is indicated by the second-decimals hand (only when in CD mode). To change between 1x and ∞ modes, press button [D] while the timer is running.
During the first 60 seconds after start and the last 5 minutes of a countdown period, the seconds hand will be driven smoothly. Outside of these periods of time, the countdown timer will change into the power saving mode (see below under "Technology"). In this mode, the seconds hand will move in the regular sweep mode or one-second-step fashion (depending on the setting).
If you change to another mode while the countdown timer is running, it will continue to run internally and the audible signal will be heard after the countdown has been completed.
Shortcut to 5 or 10 minutes
To quickly set the CD time to 5 or 10 minutes, long-press button [SET] in CD mode whenever the timer is not running or while in set submode. The setting will alternate between 5 and 10 minutes at each long-press.
Alarm Mode (AL)
The alarm mode offers a 24-hour alarm. The alarm time is indicated on the main dial. As in the normal keeping mode, refer to the date indicator to differentiate between AM and PM.
A unique feature of Cronosurf is the indication of the remaining time till the next alarm, which naturally can be in the range of 0 to 24 hours. This is indicated by the seconds hand by pointing anywhere between the 0 and 24-minute position. As a graphical reminder, the latter position is labeled with "24H".
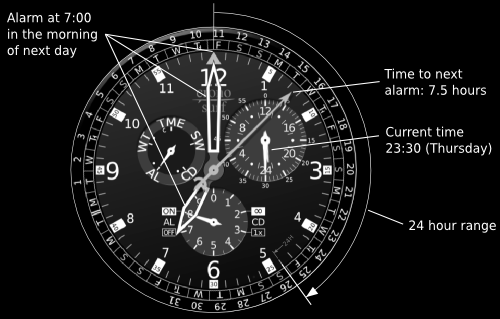
The alarm status ON/OFF is indicated by the second-decimals hand at any time except when in SW and CD modes. When in alarm mode, but outside of the setting submode, press button [C] to switch the alarm ON or OFF.
To set the alarm time, press button [SET]. The hour hand will shortly wiggle. Adjust as needed with buttons [C] and [D] and press [SET] again. Now adjust the minute hand. Pressing [SET] once again finishes the setting procedure which is confirmed by a high pitched beep. Note that as soon as any hand is adjusted, the alarm will be automatically switched on.
Shortcut
Press button [SET] for 1 second while in alarm set submode to quickly set the alarm time to the current local time plus 2 minutes. The seconds hand will reflect this by pointing at the 12 o'clock position, meaning that the alarm will sound shortly (less than 2 minutes). This comes in handy if the alarm time that you want to set is close to the current local time or you simply want to test the alarm. (Adjust further as needed.)
The second time you press [SET] for 1 second, the alarm time will jump to the current local time plus 8 hours. This is helpful for quickly setting an alarm before going to sleep. (Adjust further as needed.)
World Time Mode (WT)
When in world time mode, the main dial shows the user defined world time, while the 24-hour dial shows the local time. The WT is set as a time zone defined by a time offset (difference) relative to UTC (Universal Time Coordinated, same as GMT or Greenwich Meridian Time). By default, the time zone or offset is zero which corresponds to UTC time. The time zone can be set from -12 to +14 hours in 15‐minute steps. These steps are needed for some countries or regions that have an extra 15 or 45 minutes offset. It is recommended to keep an eye on the date indicator in order to differentiate between AM and PM and to monitor the date of the world time, which can deviate by up to +/-2 days from the local time date.
Note: In versions prior to Web.2.5.0, the WT was set relative to local time.
To set the WT time zone, press the [SET] button. The hour hand will shortly wiggle. Adjust it as needed with buttons [C] and [D] and press [SET] again. Now adjust the minute hand as needed in 15‐minute steps. Pressing [SET] once again finishes the setting procedure which is confirmed by a high pitched beep.
While in set submode, the time offset will be shown by the seconds hand on the second scale, with one second on the scale corresponding to one full hour.
Important!
The correct indication of the UTC-based world time relies on the proper time and timezone settings of the device at system level.
Date and Day
The two outer rings on the main dial show the date (1-31) and the day of the week (first letter). Both can be read at the 12 o'clock position. Furthermore, the rings show a practical overview of all days of the current month, which can be used as a one-month calendar.
Since the date rings turn steplessly, the date pointer or indicator (the triangular shape at the 12 o'clock position) gives a hint of the time of the day. Around midday, the date indicator will be centered on the day.
Week number
Press and hold [SET] while in TME mode to consult the current week number based on local time (according to the ISO-8601 standard). The minute hand will point to the corresponding number on the minute scale for as long as the button is pressed. The shown number can be in the range 1 through 53.
Calendar
The Calendar is a submode of the time mode (TME) and offers a complete 100-year-Calendar for the years 1950 to 2049.
Calendar for the current month
Pressing button [SET] while in TME mode will enter the Calendar submode, starting always at the current date. The date and day of the week are still indicated at the 12 o'clock position as in TME mode. But now, the year, month and last day of the month are additionally shown.
The current year is indicated by its two last digits. The possible range of 100 years begins at 1950. Therefore, 50 stands for 1950, 00 for 2000 and 49 for 2049.
The second-decimals hand indicates the tens digit of the year, whereas the hour hand indicates the ones digit. Both can point to a number between 0 and 9 (the 12 position on the hour scale corresponds to 0). Example: For the year 2014, the second-decimals hand points to 1 and the hour hand to 4.
The current month is indicated by the minute hand on the 12-hour dial. The positions 1 to 12 correspond to January to December.
The seconds hand points toward the last day of the month on the date rings. This can be any day from 28 to 31.
The 24-hour dial shows the local time.
So in summary, you have the complete date and time at one glance as follows:
- Second-decimals hand (bottom dial) = tens digit of the year
- Hour hand (12-hour dial) = ones digit of the year
- Minute hand (12-hour dial) = month
- Seconds hand (date rings) = last day of the month
- 24-hour dial = current local time
This example visualizes the calendar mode:
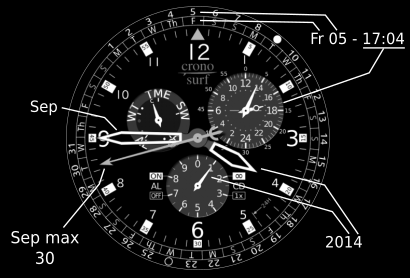
In order to remember the hand sequence for the year and month easily, the same principle of conventional hour and minute hands can be used: small hands represent big values. Therefore, the smallest hand, i.e. the decimals hand, represents the biggest value: the tens digit of the year. You can also make this mental note: Minute = Month.
Calendar for any month from 1950 to 2049
From here, pressing buttons [C] or [D] will increase or decrease the date by one month correspondingly. Holding the button pressed will change the year instead. This will take you to any desired month between January 1950 and December 2049. Note that this does not change the watch date, it merely lets you browse the calendar.
For any month other than the current month, the Date and Day Rings will turn such that the 1st of the month is always at the 12 o'clock position.
To exit the Calendar, press button [SET] once again. Pressing buttons [A] or [B] will also exit this submode and change to the next mode accordingly.
Temperature indicator
Shows the temperature of your location (mode AUTO - needs geo-location permission from the browser) or that of the city you enter (mode MAN). The data is retrieved periodically from OpenWeatherMap.org.
Setting AL/CD via the URL
Cronosurf Wave has a special function that allows you to load the page with a given alarm or countdown time to start with. Just enter the address in your browser as follows:
- Alarm: cronosurf.com?a=<3-or-4-digit-time, 24h format>
Example for 7:30 PM: cronosurf.com?a=1930
Example for 2:30 AM: cronosurf.com?a=230
- Countdown minutes: cronosurf.com?c=<minutes, max 720>
Example for 15 min: cronosurf.com?c=15
- Countdown full: cronosurf.com?c=<(H)h(M)m(S)s>
Examples:
cronosurf.com?c=50s
cronosurf.com?c=1m30s
cronosurf.com?c=2h18m
cronosurf.com?c=8h
Technology
Cronosurf was realized with JavaScript and a HTML5 framework named KineticJS (KineticJS copyright and permissions notice). It is basically an online chronograph which can be also used as an online stopwatch/chronometer and an online timer. However, once it is loaded, it does not require an active Internet connection any longer. (Note that some changes in the preferences trigger a page reload, which requires an Internet connection.)
Cronosurf takes the time from the computer or device where it is running. Therefore, the time accuracy depends fully on you having your device on time or on an automatic synchronization through the net.
Cronosurf should run correctly and smoothly on most modern web browsers. In order to offer a smooth animation on the one hand and a low computing power demand on the other, Cronosurf works with a low and a high frame rate (5 and 40 frames/s respectively) and switches between them according to the situation. The low frame rate is yet fast enough to allow for a realistic sweep motion of the seconds hand that looks like many mechanical watches (many of which run at 5 cycles per second).
The low frame rate or power saving mode is active most of the time. The high frame rate kicks in whenever any of the hands has to move quickly by a large amount. This happens normally when the page is (re)loaded or when the watch mode is changed.
Also, whenever the watch is in either SW or CD mode and the smooth running phase is active, the watch will run at the high frame rate, otherwise at the low rate. The smooth running phases are as follows:
- SW mode: first 5 minutes
- CD mode: first 60 seconds after start and last 5 minutes of the countdown time.
This feature can theoretically make a difference when using Cronosurf on a mobile device when it comes to battery running time. Moreover, it mimics the power saving mode that is used in many real electronic wrist chronographs.
Disclaimer
The reliability of the alarm and countdown timer depends on the web browser, the device and the operative system. Moreover, if the device enters the standby mode, the alarm will most probably not be triggered. Specially smartphones and tablets have shown some problems in this respect and with playing sounds from within the browser in general. Please be aware of this. For these devices, we recommend the Cronosurf app which is already available for Android.
Although this software has been tested extensively, its error-free operation can not be guaranteed on any browser or device, nor on all situations. The author is not responsible for any damage resulting from the use of this software.
Back to beginning of User Manual ▲
Copyright 2015 – 2025