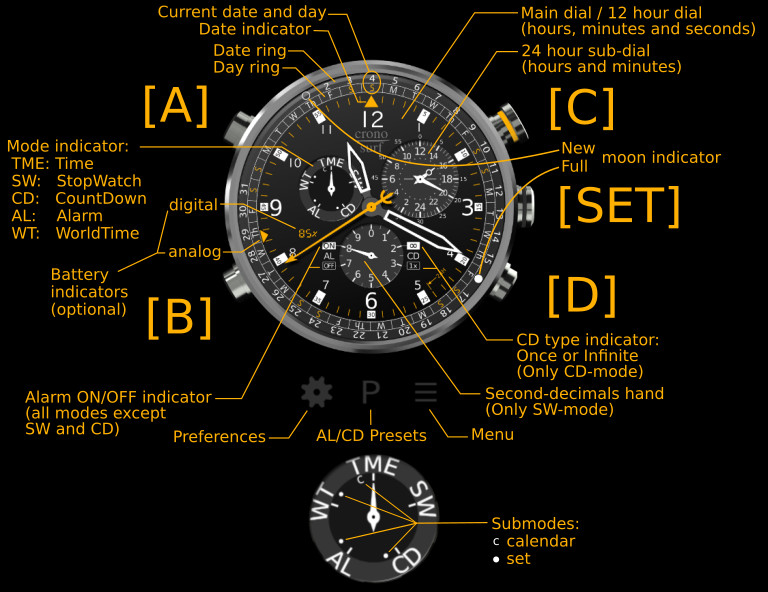
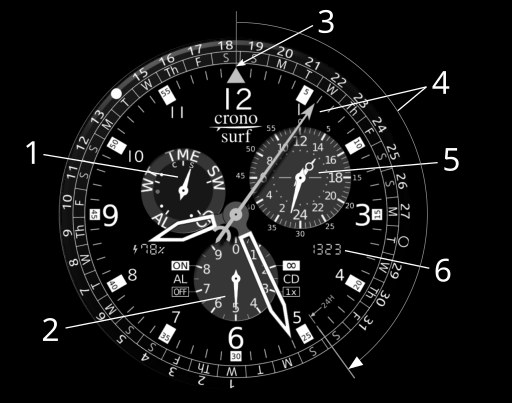
Figure 1. Parts of the watch
Welcome to the Android and Wear OS version of Cronosurf Wave! This app is based on the original design started 2014 as a web-based technology demonstrator (see cronosurf.com). It offers the same functionality as the web version plus some extra features.
Getting started
The Button Assistant function - already known from the Cronosurf website - that labels each button according to the momentary state of the watch, is now integrated in the app (portrait mode only). Use it for quickly getting familiarized with the basic functions. To activate it, simply tap on the area above the watch.
The following figure shows the main parts of the watch and the operation buttons:

Figure 1. Parts of the watch
Press button [A] to change the watch mode clockwise and [B] to change it counter-clockwise. The function of the buttons [C], [D] and [SET] are mode dependent.
Long-pressing of buttons
In some situations, specific buttons have a special function when they are pressed and held down for at least 1 second. This will be referred to in this manual sometimes simply as a long-press.
Situational awareness
When reading the watch, we recommend always taking the first glance at the mode indicator in order to be aware of the current mode (and possibly submode) and therefore of what the main hands are indicating. We also recommend often controlling the alarm ON/OFF state, which is shown by the decimals hand in all modes except SW and CD.
On smartwatches, the buttons [A], [B], [C], [SET] and [D] are mapped to invisible on-screen areas as follows:
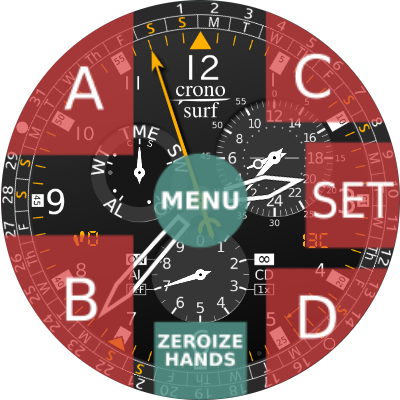
You can display this reference labels anytime via the graphical menu pressing the button ![]() (or long-pressing the button
(or long-pressing the button ![]() in the Pro version).
in the Pro version).
* You may cancel the countdown or regular alarm signal by either pressing any button or by tapping on the watch face. When doing so, the original function of the button or touch area will be suppressed.
Alternatively, you may cancel the signal by pressing one of the volume buttons of the device, or by placing the hand near the proximity sensor next to the earpiece (only phones).
By default, the alarm and the countdown timer signals are only audible ("Beep only"). It is now possible to change this setting to "Vibrate only" or "Both". These settings can take into account different situations like loud or silent environments, or devices which have only either sound or vibration.
This is accomplished through set submodes which are activated by pressing the [SET] button. A single beep will be heard and the hand to be set will shortly perform a wiggling motion. Now, press buttons [C] or [D] as needed to change the value of the active hand. Holding the button pressed will continuously change the value. Once the desired value has been reached, press button [SET] again to proceed with the next hand. After the last hand is set, pressing button [SET] once more will exit the set submode. This will be confirmed by a high pitched beep.
Depending on the preference setting for the set buttons (advanced preferences), its operation direction may be either logic ( [C] + / [D] - ) or geometric ( [C] CCW / [D] CW ).
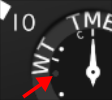
Note: Each of the settable modes has a dot symbol on the mode dial (see Figure 1.). The mode hand will advance to this position to indicate that the set submode is active.
Note: If during the setting procedure one of the buttons [A] or [B] is pressed, the settings up to this point will be accepted, a confirmation high pitched beep will be heard and the mode will change as commanded.
Note: The watch will automatically exit the set-submode after a timeout of 90 seconds of inactivity.
As an alternative, the active hand can also be set by dragging with the finger on the central area of the watch face (see chapter Invisible touch areas). (Not available on Wear OS watches).
One distinctive characteristic of Cronosurf Wave is its 24-hour subdial which shows noon at the top and midnight at the bottom, unlike other chronographs where it appears the other way around. We believe that this approach is more intuitive and informative, since the hour hand corresponds approximately to the sun position as seen when facing south. For this reason, the 24-hour hand has a small circle on it symbolizing the sun.
A newly introduced option under advanced preferences (only PRO version) allows to customize the 24-Hour subdial to display either noon or midnight at the top.
This subdial shows the world time when in TME mode. In all other modes however (even in calendar submode), it shows the local time. This means that, regardless of the active mode, you will always see the local time either on the main dial or on the 24-hour subdial.
The Button Assistant shows the function of each button dynamically, depending on the current state of the watch. This will help you to get familiar with the operation of Cronosurf Wave in a very short time. Tap on the area above the watch to activate it. A second tap shows information fields below the watch, and a third tap deactivates again the assistant.
Apart from the obvious touch areas for the five operation buttons and the three icons below the watch, there are some invisible touch areas that can be used as follows (see Figure 2.):
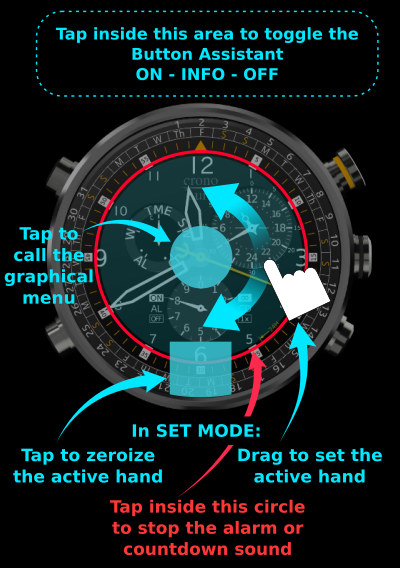
Figure 2. Invisible touch areas
Touch on the center of the watch face to open the graphical menu. It gives quick access to often used functions, like changing the highlight color (PRO version) or toggling the Screen-On timer. It consists of a 3x3 grid with different buttons that depend on the version (free/PRO) and on the type of device.
The procedure to set Cronosurf as an LWP is the same as for any other LWP. This may vary depending on your Android Device. The standard method is to long-press on an empty area on the homescreen and then select "Live Wallpapers".
Moreover, the standard Android Lock Screen shows the active LWP in the background, which lets you see the Cronosurf LWP without having to unlock the screen. However, some devices may have different implementations of the Lock Screen which require a special procedure or an external app to accomplish this, or do not allow it at all.
If you wish to lock the watch in a different mode, long-press [B] while in that mode. The Auto-Return function will be disabled temporarily until the mode is changed.
In the PRO version, there is a setting (advanced preferences) which makes possible to disable Auto-Return permanently until re-enabled manually.
*Except when the screen-on timer is active
With the help of the date indicator, you can easily determine whether the indicated time corresponds to AM or PM. (See below Date and Day.)
Shortcut
To return to the time mode from any other mode, press button [A] for 1 second or tap on the Cronosurf logo.
Press button [C] to start and stop the stopwatch. While stopped, press button [D] in order to reset the hands to the zero position. The operation START is confirmed by a normal pitched beep, while the the operations STOP and RESET are confirmed by a high pitched beep.
During the first five minutes, the seconds hand will be driven smoothly (high frame rate) and the second-decimals hand will run continuously. After this period of time, the stopwatch will change into the power saving mode. In this mode, the seconds hand will move in the regular sweep mode or one-second-step fashion (depending on the setting under advanced preferences), and the second-decimals hand will be parked at the zero position. Once the stopwatch is stopped, the second-decimals hand will move to the value that corresponds to the time measurement.
If you change to another mode while the stopwatch is running, the time measurement will continue to work internally. Since it is based on timestamps, even rebooting the device will not affect the accuracy of the time measurement.
*By activating the option "Left digital indicator" in the preferences, the elapsed time is shown digitally from '1h' to '99d23h', effectively extending the measurement range to 100 days. During the first hour, the thousandths of a second are shown instead.
QuickStopwatch function (only PRO version)
When the "QuickStopwatch" function is enabled (advanced preferences), pressing button [C] while in time mode (TME) will immediately change the mode to SW and start it. In case the stopwatch was already running or paused, the mode will simply change to SW.
Flyback function (only PRO version)
Press button [D] in SW mode when the stopwatch is running to stop, reset and restart the stopwatch at once. This function is often used by pilots. It is useful to perform repeated time measurements or to immediately correct the start of a time measurement in case of error - with one push of the button, instead of three.
The flyback function is also known by these names:
Split function (only PRO version)
While the stopwatch is running, you may measure a split time by pressing [SET]. This will be confirmed by two beeps in rapid succession at normal pitch and by the mode hand pointing at the 'S' of SW (stands for Split). The stopwatch hands pause to show the split time, but the stopwatch continues to run in the background.
Press [SET] again to release the split time. This is confirmed by a high pitched beep.
To measure cumulative split times:
| [C] | ➔ | [SET] | ➔ | [SET] * | ➔ | [C] | ➔ | [D] |
| START | SPLIT | SPLIT RELEASE | STOP | RESET |
To measure two times, like the finishes of two runners:
| [C] | ➔ | [SET] | ➔ | [C] | ➔ | [SET] | ➔ | [D] |
| START | SPLIT 1st runner finishes Display 1st time |
STOP 2nd runner finishes |
SPLIT RELEASE Display 2nd time |
RESET |
Press button [C] to start and stop the timer. While stopped, press button [D] to reset the hands to the preset countdown time. The operation START is confirmed by a normal pitched beep, while the the operations STOP and RESET are confirmed by a high pitched beep.
To set the countdown timer, press button [SET] while the timer is stopped. The hour hand will shortly wiggle. Change its value with buttons [C] and [D] as needed. Repeat the procedure for the minutes and seconds hand. Pressing [SET] once again finishes the setting procedure which is confirmed by a high pitched beep.
The countdown timer has two different modes, "1x" and "∞":
Mode 1x (one-time): Once the countdown has been completed, the audible CD alarm will be heard (2 normal pitched beeps every 1.5 seconds) during 30 seconds, unless it is confirmed by pressing any button. After this, the CD will be automatically reset and be ready for its next use.
Mode ∞ (repeat infinitely): The timer will reset itself automatically and run from the beginning in an endless loop. Each time a countdown cycle is completed, there will be only one CD audible signal cycle (2 normal pitched beeps).
Note: In order to avoid running in mode ∞ unintentionally, the mode reverts to 1x whenever a new countdown time is set.
The current mode is indicated by the second-decimals hand (only when in CD mode). To change between 1x and ∞ modes, press button [D] while the timer is running.
During the first 60 seconds after start and the last 5 minutes of a countdown period, the seconds hand will be driven smoothly. Outside of these periods of time, the countdown timer will change into the power saving mode. In this mode, the seconds hand will be moved in a one-second-step fashion (or sweep depending on the setting under advanced preferences).
If you change to another mode while the countdown timer is running, it will continue to run internally and the audible signal will be heard after the countdown has been completed. Even if the device is rebooted, a pending countdown will be resumed accordingly.
Shortcut to 5 or 10 minutes
To quickly set the CD time to 5 or 10 minutes, long-press button [SET] in CD mode whenever the timer is not running or while in set submode. The setting will alternate between 5 and 10 minutes at each long-press.
A unique feature of Cronosurf is the indication of the remaining time till the next alarm, which naturally can be in the range from 0 to 24 hours. This is indicated by the seconds hand by pointing anywhere between the 0 and 24 position on the seconds scale. As a graphical reminder, the latter position is labeled with '24H'.
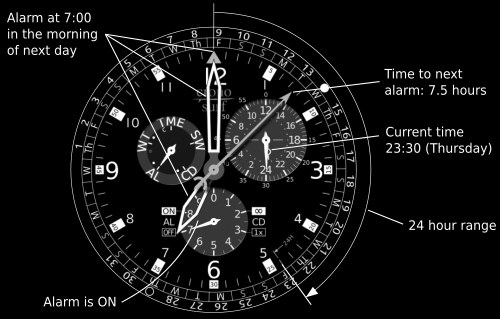
The alarm status ON/OFF is indicated by the second-decimals hand at any time except when in SW and CD modes. When in alarm mode, but outside of the set submode, press button [C] to switch the alarm ON or OFF.
To set the alarm time, press button [SET]. The hour hand will shortly wiggle. Adjust as needed with buttons [C] and [D] and press [SET] again. Now adjust the minute hand. Pressing [SET] once again finishes the setting procedure which is confirmed by a high pitched beep. Note that as soon as any hand is adjusted, the alarm will be automatically switched on.
Shortcut
Press button [SET] for 1 second while in alarm set submode to quickly set the alarm time to the current local time plus 2 minutes. The seconds hand will reflect this by pointing at the 12 o'clock position, meaning that the alarm will sound shortly (less than 2 minutes). This comes in handy if the alarm time that you want to set is close to the current local time or you simply want to test the alarm. (Adjust further as needed.)
Press [SET] again for 1 second to quickly set the alarm time to the current local time plus 8 hours. This is helpful for quickly setting an alarm before going to sleep. (Adjust further as needed.)
Depending on the preference setting "Repeat alarm daily", the alarm will repeat daily or sound only once, after which it will change to the status OFF automatically.
When in World Time mode, the main dial will show the user defined world time, while the 24-hour dial shows the local time. The WT is set as a time zone defined by a time offset (difference) relative to UTC (equivalent to GMT). By default, the time zone or offset is zero which corresponds to UTC time. The time zone can be set from -12 to +14 hours in 15‐minute steps. These steps are needed for some countries or regions that have an extra 15 or 45 minutes offset. It is recommended to keep an eye on the date indicator in order to differentiate between AM and PM and to monitor the date of the world time which can deviate by up to +/-2 days from the local time date.
Note: In versions prior to 4.2.0, the WT was set relative to local time.
To set the WT time zone, press the [SET] button. The hour hand will shortly wiggle. Adjust it as needed with buttons [C] and [D] and press [SET] again. Now adjust the minute hand as needed in 15-minute steps. Pressing [SET] once again finishes the setting procedure which is confirmed by a high pitched beep.
The left digital indicator shows the adjusted time zone while in World Time mode. When the set submode is active, the time zone will be shown additionally by the second hand with one second on the scale corresponding to one full hour.
Shortcuts for UTC and local time
While in set submode, you may quickly set the world time to UTC (offset = zero) by a tap on the zeroize area (see chapter Invisible touch areas). Tapping a second time will set it to the local time zone.
Secondary world time (only PRO version)
The PRO version offers a secondary WT. This feature is convenient when often traveling between two cities with different time zones, for example between your home city and city X. Set the primary world time to the time zone of city X and use it while you are in your home city. Set the secondary WT to the time zone of your home city and use it while you are in city X.
You can toggle between the primary and secondary WT by long-pressing button [SET] while in World Time mode. To identify which one is active, look at the left digital indicator. The primary indication uses a lowercase 'h' for the hours, while the secondary uses an uppercase 'H'.
Important!
The correct indication of the UTC-based world time relies on the proper time and timezone settings of the device at system level.
The two outer rings on the main dial show the date (1-31) and the day of the week (first letter). Both are indicated at the 12 o'clock position by the date pointer or indicator (the triangular shape at the 12 o'clock position). Since the date rings turn steplessly, the date indicator gives a hint of the time of the day. Around midday, the date indicator will be centered on the day.
Furthermore, the rings show a practical overview of all days of the current month, which can be used as a one-month calendar.
Press and hold [SET] when in TME mode to consult the current week number based on local time. The minute hand will point to the corresponding number on the minute scale for as long as the button is pressed. The shown number can be in the range 1 through 53.
There are different week numbering standards worldwide. By default, Cronosurf uses the numbering that corresponds to the language/country that is set in the system settings. Under advanced preferences, you may change this setting (Auto) to ISO-8601 standard (most countries) or to US standard.
The Calendar is a submode of the time mode (TME) and offers a complete 100-year-Calendar for the years 1950 to 2049.
The current year is indicated by its two last digits. The possible range of 100 years begins at 1950. Therefore, 50 stands for 1950, 00 for 2000 and 49 for 2049.
The second-decimals hand (lower subdial) indicates the tens digit of the year, whereas the hour hand on the main dial indicates the ones digit. Both can point to a number between 0 and 9 (the 12 position on the hour scale corresponds to 0). Example: For the year 2014, the second-decimals hand points to 1 and the hour hand to 4 (see Figure 3.).
The current month is indicated by the minute hand on the main dial. The positions 1 to 12 correspond to the months January to December.
The seconds hand points toward the last day of the month on the date rings. This can be any day from 28 to 31.
The 24-hour dial shows the local time.
So in summary, you have the complete date and time at one glance as follows:
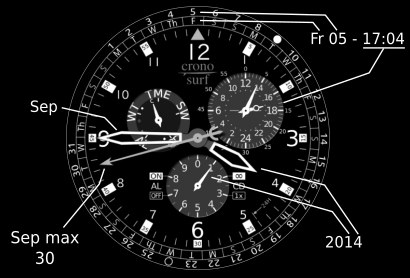
Figure 3. Calendar example: Friday the 5th of September, 2014
In order to remember the hand sequence for the year and month easily, the same principle of conventional hour and minute hands can be used: small hands represent big values. Therefore, the smallest hand, i.e. the decimals hand, represents the biggest value: the tens digit of the year. You can also make this mental note: Minute = Month.
For any month other than the current month, the Date and Day Rings will turn such that the 1st of the month is always at the 12 o'clock position.
To exit the Calendar, press button [SET] once again or change the watch mode by pressing [A] or [B].
Note: The watch will automatically exit the calendar submode after a timeout of 90 seconds of inactivity.
Digital year indication
The left digital indicator will show the year of the calendar when the calendar submode is active.
Both full moon and new moon days are indicated on the date ring. A filled circle and an outlined circle will be shown respectively. The date at which each event occurs depends on the current time zone of the device. Therefore, changing the timezone can sometimes lead to a change of a given moon event by up to two days.
The indication of the moon phases will persist in the calendar month. This enables you to see all past and future moon phases within the full 100 year range of the calendar.
By default, this function is enabled, but you may disable it through the preferences.
Cronosurf can retrieve the following weather information from the Internet for a city of your choice:
By default, the weather information function is disabled. Enable it in the preferences by going to WEATHER INFO and setting the Data option to either "Temperature + sunrise/sunset" or "Only coordinates for calculation...". Then, enter the place name of your choice under "Location". The app can also store a standby location for quick access. Tap on the standby location entry in order to swap the locations.
Once the temperature function is enabled and a location is set, Cronosurf will show the temperature on the right digital indicator.
While in TME mode and when the temperature is visible, pressing and holding button [D] will temporarily switch the indication to the relative humidity in percentage, shown by two digits followed by 'rh'. (In case the minute hand covers the indicator, it will move to the 15 minute position while the button is pressed.) Release the button to switch back to the temperature indication.
The weather data is automatically updated every 30 minutes. If needed, you can force a data refresh manually. While in TME mode, press and hold button [D] for 5 seconds until you hear a beep. A message appears indicating either that the refresh was successful or that the data could not be loaded. (This only works if the weather information function is enabled and a location has been entered.)
In case that the weather data is invalid or the device cannot establish an Internet connection, the temperature indication will change to two dashes: '--'.
Note that the Screen-On timer has a higher display priority and, when active, it will overwrite the temperature. In this case, press button [D] while in TME mode to get the reading back for a few seconds.
To consult this information, press [SET] twice from the TME mode to enter the Sun submode.
The mode hand will point to the small 'S' which stands for Sun. The event time is shown by the hour and minute hands. Refer to the date indicator to distinguish between morning and afternoon. The decimals hand which points upwards to indicate a sunrise, and downwards to indicate a sunset.
Press button [C] to toggle between sunrise and sunset.
The seconds hand indicates the remaining time in hours to the shown sunrise/sunset event by pointing accordingly between the 0 and 24 position on the seconds scale. As a graphical reminder, the latter position is labeled with '24H'.
The right digital indicator indicates the day length (period of time between sunrise and sunset) with four digits (e.g. "1052" = 10 hours and 52 minutes).
For some locations near the poles (latitudes above 67N and below 67S), there can be periods of time where there is neither sunrise nor sunset. In this case, the seconds, hour and minute hands will point to the 9 o'clock position. The day length will show either "0000" (continuous darkness) or "2400" (continuous daylight).
Shortcut for swapping the active and standby locations
Long-press button [SET] while in Sun submode.
If supported by the hardware, Cronosurf offers a compass function that runs as a submode of the World Time mode. The availability of the compass is recognizable on the mode indicator by a gray dot at the left of the World Time mode mark. If the compass sensor is available, the gray dot will be visible and the compass function can be started. Once started, the mode hand will point to this dot. (Otherwise, the gray dot will not be visible and the compass function cannot be started.)
Note that most Android devices need a compass calibration before the readings are reliable. This consists generally of spinning the device in a figure 8 pattern. Please make sure that you employ the proper method for your device.
The app will save the reference heading and retain it even after a restart of the device.
Press [C] again to release the reference heading.
This function gives you a quick access to your favorite alarm and countdown times - two each (four in the PRO version). To access the presets, press on the "P" symbol below the watch. This will open a window showing all the presets together with the current alarm and countdown settings at the top. You may now activate/start any desired preset by touching it.
If you want to change a preset, first set the alarm or countdown time as needed. Then, open again the presets window and overwrite the desired preset through long-pressing on it. The next long press will restore the default value.
There are three different battery level indicators:
In order to keep the screen for a longer time than the device screen timeout time, you can use the inbuilt Screen-On timer. To activate it, open the graphical menu and press the button that shows a bulb and a timer symbol: ![]() . The starting value is 5 minutes. Once activated, it can be further adjusted through same button or by swiping* left or right on the watch face. At each swipe, the timer will toggle through these possible settings:
. The starting value is 5 minutes. Once activated, it can be further adjusted through same button or by swiping* left or right on the watch face. At each swipe, the timer will toggle through these possible settings:
* On Wear smartwatches, swiping is reserved for the system. Use the graphical menu instead.
THIS SOFTWARE IS PROVIDED "AS IS" WITHOUT WARRANTY OF ANY KIND. THE AUTHOR MAKES NO WARRANTIES, EXPRESS OR IMPLIED, THAT THE SOFTWARE IS FREE OF ERROR, OR THAT IT WILL MEET YOUR REQUIREMENTS FOR ANY PARTICULAR APPLICATION. IT SHOULD NOT BE RELIED ON FOR ANY PURPOSE WHOSE INCORRECT BEHAVIOR COULD RESULT IN INJURY TO A PERSON OR LOSS OF PROPERTY. IF YOU DO USE THEM IN SUCH A MANNER, IT IS AT YOUR OWN RISK. THE AUTHOR DISCLAIMS ALL LIABILITY FOR DIRECT, INDIRECT, OR CONSEQUENTIAL DAMAGES RESULTING FROM THE USE OF THIS SOFTWARE.
Copyright 2015 – 2024